How to Properly Put on Contacts – A Detailed Guide

The number of people wearing contact lenses is increasing with every passing day. That’s because for most of these people, wearing lenses changes the quality of their life for the better. However, to enjoy the advantages of wearing contacts, you must know how to wear them properly. Additionally, you must also know how to take care of your lenses. Without proper care, your contact lens can lead to serious issues such as infections.
You may be new to contact lenses or might be wearing them for years; you cannot afford to be careless when putting in, removing, and caring for the lenses. The section below will help you to understand the right way of handling your contact lenses.
Getting Yourself Ready Before Putting in Your Contact Lenses:
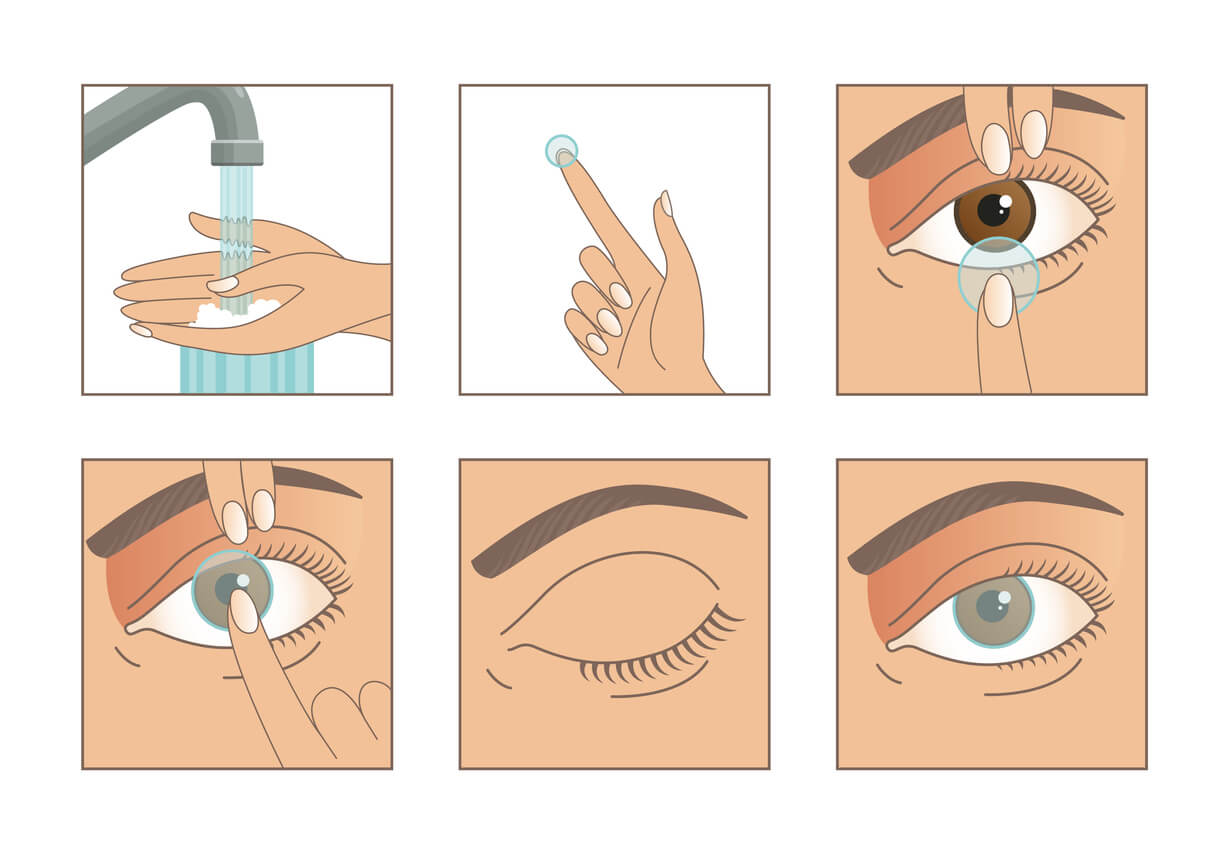
Before you know how to properly put on the contacts, you must know how to prepare yourself for the process. Begin by washing your hands with soap. Once done, dry your hand well. You should keep the contact lens case handy to ensure that you don’t need to touch too many things after washing your hands. Open the contact lens case.
Getting the Contact Lens Ready:

Place the first contact lens on the left hand (i.e., your non-dominant hand) using your fingertip. Rinse it using a contact lens solution. Never wash your contact lenses using regular tap water that can not only contaminate them but can also damage them. Put the rinsed contact lens on top of the middle finger of your right hand (i.e., your dominant hand) and check it closely. You shouldn’t move to the next step if you notice any damage.
Also, make sure that you have your eye open with the correct side of the lens facing you. If you see that the lens is not forming a bowl, flit it gently.
How to Put in Contacts?
Stand in front of a mirror and open your lower eyelid and upper eyelid using the hand that doesn’t have the lens in it. Look up at the ceiling or in your front and place the contact lens inside your eye. Slowly, close the eye and roll it around to allow the lens to settle in place. You can also press your eyelid gently to allow the contact lens to take its position. Blink a few times. You should feel comfortable and should be seeing everything clearly.
If there’s any discomfort in your eyes, remove the lens gently, rinse it again, and repeat the process. You should follow the same method when putting in both contact lenses.
Step by Step: Best Way to Put In Contact Lenses
Following these steps can help ensure a comfortable and healthy contact lens wearing experience.
Step 1: Prepare the Lens
- Always begin by thoroughly washing and drying hands with soap and a clean, lint-free towel to remove any bacteria.
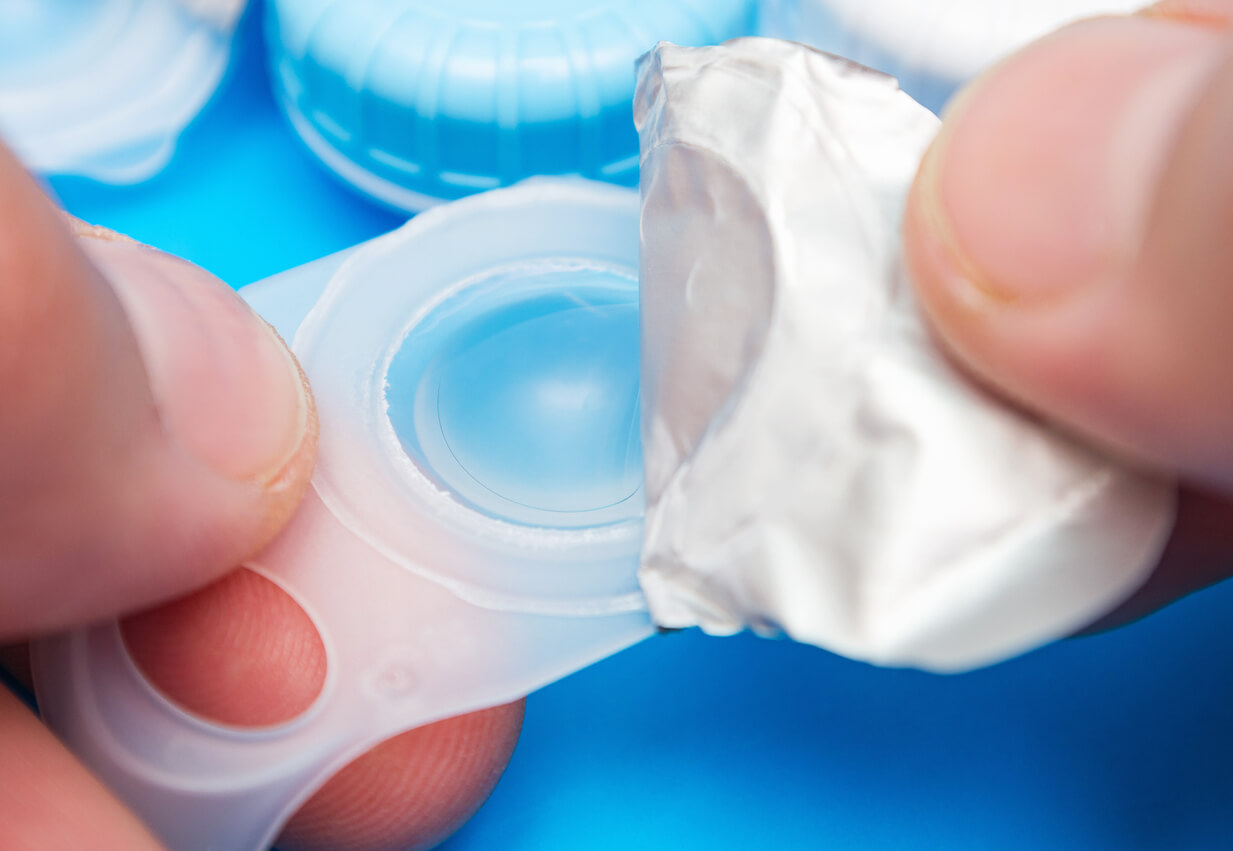
- Rinse the lens with the appropriate contact lens solution to remove any deposits or debris. Water, saliva, or other fluids should not be used for this purpose.
- Inspect the lens to ensure it’s clean, undamaged, and not inside out. The correct position of a lens is a perfect cup shape.
Step 2: Place the Lens over Your Iris
- Using the dominant hand, place the contact lens on the tip of the index finger, ensuring it retains its cup shape.
- Use the other hand to hold the upper eyelid to avoid blinking.
- Use the middle finger of the dominant hand to pull down the lower eyelid.
Step 3: Insert and Centre the Lens
- Gently place the lens on the eye, ideally aiming for the white part first to minimize discomfort.
- Once the lens is in place, look upwards to help slide the lens into position over the iris.
- If the lens feels uncomfortable, remove it, rinse it with the solution, and try again.
Step 4: Adjust for Comfort
- Release the eyelids and close the eye for a moment after the lens is in position.
- Blink several times to center the lens on the iris.
- If the lens is centered and comfortable, repeat the process with the other eye.
- In case of discomfort, try adjusting the lens by moving it around with a clean finger.
Quick summery:
| Step | Instructions |
|---|---|
| 1. Prepare the Lens | Clean hands and lens, inspect the lens for any damage or debris |
| 2. Place the Lens over Your Iris | Hold your eyelids and position the lens on your finger |
| 3. Insert and Centre the Lens | Gently place the lens on your eye and adjust it over your iris |
| 4. Adjust for Comfort | Close your eye, blink a few times and adjust the lens if necessary |
Keep in Mind While Putting in Contact Lenses
Hand Hygiene
Always wash and dry your hands thoroughly before handling contact lenses to avoid any potential contamination.
Inspect the Lenses:
Prior to insertion, check the lens for any damage, debris, or if it’s inside out.
Use Contact Lens Solution:
Contact lenses should be rinsed with a recommended contact lens solution, not tap water or any other fluid.
Proper Placement:
When placing the lens on your finger, make sure it forms a perfect cup shape, indicating it is not inside out.
Blink Control:
Try to control your blink reflex while inserting the lenses, holding your eyelids open can help.
Lens Centering:
After inserting the lens, blink several times to help center the lens on your eye. It should sit on the cornea and slightly overlap the white part of your eye.
Comfort Check:
Always ensure that the lenses feel comfortable on your eyes. If not, remove them, rinse with solution, and try again.
Consult a Professional:
If you continue to experience discomfort or problems, consult your eye care professional.
Other Popular Methods for Putting in Contact Lenses
While the above method is the most recommended, some other popular methods include:
- Direct Iris Placement: Some users prefer to place the lens directly on the iris, rather than on the white part of the eye.
- Using Insertion Tools: For those who are uncomfortable with touching their eyes, using a contact lens insertion tool might be helpful.
- Pull and Blink Method: This involves pulling the lower eyelid down, placing the lens on the white of the eye, and then releasing the lower lid while looking down. The lens typically centers itself when the user blinks.
Practicing these methods will make the process easier. However, persistent discomfort or problems should be addressed by an eye care professional.
Here is a table to help visualize the steps:
And always remember, if you have any problems or questions, consult your eye care professional.
Are Hard and Soft Contact Lenses the Same When Worn?
The most widely used variant of hard contact lenses is rigid gas-permeable lenses. This lens type allows oxygen to enter our cornea. Other than that, they are also more durable compared to soft contact lenses. Still, most people opt for soft contacts instead of hard ones. That’s because hard contacts increase the wearer’s chances of getting an eye infection. Other than that, they are also not very comfortable. As a result, your eye doctor will possibly ask you to choose a soft lens as your first contact. However, when it comes to putting contact lenses, you need to follow the same process for both hard and soft lenses.
How to Manage Discomfort Resulting from Wearing Contact Lenses?
As a new user, you may feel slight irritation and discomfort after you put in contact lenses. This usually continues for a few days and is more common in individuals using hard lenses. If you feel dryness in your eyes, you can take fresh solution or use a rewetting drop formulated for contact lenses. If you experience irritation, you should consider removing the lenses. Wear it again only after rinsing it with a contact solution. If the discomfort persists, you should visit your eye doctor or consult a contact lens expert.
See also: Best Eye Drops For Dry Eyes
Removing Contact Lenses:

Now that you know how to put in contacts, you must also know how to remove contact lenses. Wash your hands well and dry them. Pull down the lower eyelid of one eye gently using your right hand. Look up and use your right hand’s index finger to carefully pull down the lens to your eye’s white part. Push it using your index finger and thumb and take it out from the eye. Place the lens on your palm and put some contact solution on it. Rub the lens gently for 30 to 40 seconds to get rid of the oil, dirt, and mucus. Rinse the contact lens well and put it inside the case. Cover it completely using a fresh contact solution. You should follow the same method to remove both contact lenses.
About Contact Lenses Care:
You may use the best brand contact lenses, but you will have to take good contact lens care of them to wear contact lenses without getting eye infections or any other issues. You should never miss storing your contact lenses inside a disinfecting solution overnight. Always throw out the contact solution right after wearing the lenses. Never forget to rinse the contact case using a saline solution and water every time you put in the contact lenses. Last but not least, replace the case after every three months.

Freshlook One Day contact lenses
Contact lens wearers who opt for daily colored disposable contacts should consider Freshlook One Day contact lenses. Made by ...

1-DAY ACUVUE TRUEYE (30)
The 1-day Acuvue TruEye (30) lens made by Johnson and Johnson, offers the highest UVA and UVB blocking among disposable conta...

Air Optix Aqua (6) contacts No prescription required
Air Optix Aqua contacts without prescription for beautiful eyes Air Optix Aqua features one of a kind SmartShield technolog...
Final Words:
If you experience issues with your eyes after wearing contact lenses, don’t hesitate to call your doctor right away. Some of the symptoms you may experience due to an eye infection are eye-watering, eye pain, light sensitivity, swelling and redness in the eyes, etc.
FAQ
Why are contacts so hard to put in?
Is contact lens insertion difficult?
Is it hard to put contacts in?
Where does a contact lens sit on the eye?
How to stop blinking when putting in contacts?
Why can't I put contacts in?
Related posts: